Friday, July 2, 2010
Monday, June 21, 2010
Visual Delights: Cinnamon Raisin Swirl Bread
Cinnamon Raisin Swirl Bread
Recipe modified from Allrecipes.com
3/4 cup milk
3/4 cup warm water (110 degrees F/45 degrees C)
1 (.25 ounce) package active dry yeast
1-1/2 eggs
1/2 cup white sugar
1/2 teaspoon salt
1/4 cup margarine, softened
3/4 cup raisins
4 cups all-purpose flour
1 tablespoon milk
3/4 cup white sugar
1 tablespoon ground cinnamon
1 tablespoon butter, melted
1. Warm the milk in a small saucepan until it bubbles, then remove from heat. Let cool until lukewarm.
2. Dissolve yeast in warm water, and set aside until yeast is frothy. Mix in eggs, sugar, butter or margarine, salt, and raisins. Stir in cooled milk. Add the flour gradually to make a firm but sticky dough.
3. Knead dough on a lightly floured surface for a few minutes. Place in a large, greased, mixing bowl, and turn to grease the surface of the dough. Cover with a damp cloth. Allow to rise until doubled.
4. Roll out on a lightly floured surface into a large rectangle 1/2 inch thick. Moisten dough with 2 tablespoons milk. Mix together 3/4 cup sugar and 2 tablespoons cinnamon, and sprinkle mixture on top of the moistened dough. Roll up tightly; the roll should be about 3 inches in diameter. Cut into thirds, and tuck under ends.
5. Place loaves into well greased 9 x 5 inch pans. Lightly grease tops of loaves. Let rise again for 2 hours.
6. Bake at 350 degrees F (175 degrees C) for 25 minutes, or until loaves are lightly browned and sound hollow when knocked. Remove loaves from pans, and brush with melted butter or margarine. Let cool before slicing.
Notes: Makes 2 loaves. Freezes well.
Tuesday, June 15, 2010
Monday, June 7, 2010
Summer Coconut Coffee Popsicles
The summer is hitting it's peak temperatures and the heat waves are getting unbearable.
After weeks of being tempted by frozen-treat-food porn and bookmarking dozens of popsicle recipes, I finally bought some molds off Taobao.com(for RMB 9.90) and have been freezing all kinds of random liquids ever since.
My thoughts so far:
-Freezing fresh fruit juices is great, even better if you also add chunks of fresh/dried fruit
-Freezing Jello is gross
-Freezing coffee is FANTASTIC (see recipe below)

Coconut Coffee Popsicles
Adapted from MyColombianRecipes
(Makes 6-8 popsicles depending on your molds)
1 can (13.5 oz) coconut milk
1 can (13.5 oz) condensed milk
1/4 cup milk
1/2 cup brewed black coffee (I used coffee Arabica)
1.Pour the three types of milk into a blender and blend until smooth.
2.Fill 3 quarters of the popsicle molds with the blended mixture. Fill the remaining spaces in the molds with coffee. Insert popsicle sticks and freeze overnight.
I want to try freezing alcohol pops next! ^0^
After weeks of being tempted by frozen-treat-food porn and bookmarking dozens of popsicle recipes, I finally bought some molds off Taobao.com(for RMB 9.90) and have been freezing all kinds of random liquids ever since.
My thoughts so far:
-Freezing fresh fruit juices is great, even better if you also add chunks of fresh/dried fruit
-Freezing Jello is gross
-Freezing coffee is FANTASTIC (see recipe below)
Coconut Coffee Popsicles
Adapted from MyColombianRecipes
(Makes 6-8 popsicles depending on your molds)
1 can (13.5 oz) coconut milk
1 can (13.5 oz) condensed milk
1/4 cup milk
1/2 cup brewed black coffee (I used coffee Arabica)
1.Pour the three types of milk into a blender and blend until smooth.
2.Fill 3 quarters of the popsicle molds with the blended mixture. Fill the remaining spaces in the molds with coffee. Insert popsicle sticks and freeze overnight.
I want to try freezing alcohol pops next! ^0^
Friday, May 28, 2010
The Unauthentic Laksa
Since my last trip back to KL (in which my dad took me to an old favorite hawker and hovered over the poor woman to make sure she increased the amount of tau-foo puffs in my curry laksa since I wouldn’t eat prawns) I have developed an unexplainable obsession for rice noodles and South East Asian spiciness.

I've recently made my own non-authentic version of a laksa (that would probably cause Malaysian hawker food snobs to snicker and point)using pumpkin, tofu and a ready made packet of laksa paste (further jeering).
400g pumpkin, chopped into bite-sized pieces
1 tablespoon vegetable oil
1 teaspoon salt
200g rice noodles (I used organic, brown rice vermicelli)
1 teaspoon vegetable oil
1 tomato, peeled and sliced
1 packet laksa paste (I used the IKAN BRAND Traditional Johor Laksa paste)
1 cup vegetable stock
400ml tin coconut milk
1/2 cup frozen tofu (defrosted and cut into bite sized cubes)
1/2 cup bean sprouts
juice of 1 lime
1. Preheat oven to 200°C. Toss pumpkin with vegetable oil and salt. Place on a baking sheet and into the hot oven, and roast for about 15 minutes or until golden.
2. Place the rice noodles in a large bowl and pour over enough boiling water to cover the noodles by at least 2.5cm. Set aside to soak for 3-4 minutes, or until softened. Drain with a colander and set aside.
3. In the same large pot, heat 1 teaspoon oil and cook the tomato slices over medium heat for a few minutes to release juices. Add the laksa paste and stock, then bring a boil. Add roasted pumpkin and tofu, allow it to simmer for at least 2 minutes. Stir in the coconut milk and bring to a simmer.
4. Finally, add the bean sprouts and simmer until almost cooked but still a bit crunchy. Season with lime juice.
5. To serve, divide the rice noodles among 2-4 bowls, ladle the hot soup over. You can garnish it with sliced spring onions and/or coriander leaves if you prefer.


These skinny, long, transparent bundles have suddenly made their comeback as Talia’s Carbs of Choice -which according to boohee.com, my newest favorite source of calorie content information-is 346 calories per 100 grams.
I've recently made my own non-authentic version of a laksa (that would probably cause Malaysian hawker food snobs to snicker and point)using pumpkin, tofu and a ready made packet of laksa paste (further jeering).
It actually did taste pretty good, so if you don't want to continue eating seafood based laksa for the rest of your life and want to live a little...
Non-Authentic Vegetarian Laksa
Adapted from Kidspot.com.au

This recipe serves 4, -though as my pictures might suggest, I made mine for ONE
Non-Authentic Vegetarian Laksa
Adapted from Kidspot.com.au
Traditional vs. non-traditional ingredients
400g pumpkin, chopped into bite-sized pieces
1 tablespoon vegetable oil
1 teaspoon salt
200g rice noodles (I used organic, brown rice vermicelli)
1 teaspoon vegetable oil
1 tomato, peeled and sliced
1 packet laksa paste (I used the IKAN BRAND Traditional Johor Laksa paste)
1 cup vegetable stock
400ml tin coconut milk
1/2 cup frozen tofu (defrosted and cut into bite sized cubes)
1/2 cup bean sprouts
juice of 1 lime
1. Preheat oven to 200°C. Toss pumpkin with vegetable oil and salt. Place on a baking sheet and into the hot oven, and roast for about 15 minutes or until golden.
2. Place the rice noodles in a large bowl and pour over enough boiling water to cover the noodles by at least 2.5cm. Set aside to soak for 3-4 minutes, or until softened. Drain with a colander and set aside.
3. In the same large pot, heat 1 teaspoon oil and cook the tomato slices over medium heat for a few minutes to release juices. Add the laksa paste and stock, then bring a boil. Add roasted pumpkin and tofu, allow it to simmer for at least 2 minutes. Stir in the coconut milk and bring to a simmer.
4. Finally, add the bean sprouts and simmer until almost cooked but still a bit crunchy. Season with lime juice.
5. To serve, divide the rice noodles among 2-4 bowls, ladle the hot soup over. You can garnish it with sliced spring onions and/or coriander leaves if you prefer.
The Not-Very-Authentic, Nor Photogenic but Tasty Bowl of Laksa
Wednesday, May 19, 2010
Oriental Veggie Wrappo
I love the vegetable wrap from Element Fresh, one of my favorite health-freak places to eat in Beijing and Shanghai. I almost always grab one of these wraps at the Hongqiao Airport for fear of going hungry on China Eastern Airlines, where they give you a nasty roujiamo (something like a chinese burger) wrapped in foil for the 2 hour flight back to Beijing.
Anyway, it's getting to be an expensive craving to fulfill regularly because I live a good 35 kuai taxi ride away from the Sanlitun branch in Beijing. So, on a boring weekend afternoon, I decided to try and reinvent something more economical. This is what I came up with...

Ingredients:
2 flour tortillas (see recipe that follows if you too, have a lot of time and flour in your hands)
For the filling
1/2 large carrot, peeled
2 stalks celery
2 cubes five-spice dried bean curd
1/2 cup enoki Mushrooms
1/2 red bell pepper
1/2 cup bamboo shoots (packaged, ready to eat)
1/2 tsp soy sauce
1/2 tsp sesame oil
2 tsp olive oil

1. Julienne the carrot, celery, bean curd and bamboo shoots into thin strips/matchsticks. Slice slice and slice away! Then, set aside.
2. Roast Bell Peppers and Enoki Mushrooms*:
Preheat oven to 230 C. Slice the bell pepper into strips and coat with 1 tsp olive oil. In a bowl, rub the enoki mushrooms with 1 tsp olive oil, sesame oil and soy sauce. Spread pepper and mushrooms in a single layer on a baking sheet, place on baking sheet and bake for 10-15 minutes until mushrooms are cooked and bell peppers are slightly browned. Allow to cool before using.
3. Spread the ingredients evenly on your tortillas. Roll up each tortilla and cut each rolled wrap in half diagonally. Enjoy.
*Alternatively, you can just stir fry them if you're in a rush, or if you like to eat your peppers raw, you can skip this~~

Note: The dried bean curd I bought was extremely flavorful and salty, so I didn't need to use much seasonings for the other veggies.
From Classic Breads: Delicious Recipes from All Around the World
Original Recipe makes 10 tortillas, but mine were a little big so I got 7...
5 cups + 650g all purpose flour
2 1/4 tsp dry yeast
1/2 tsp salt
2 tbsp margarine
1 cup + 370 g hot water
1. Mix in flour, yeast and salt in a bowl. Add the margarine (I formed some crumbs with my fingers)and slowly pour the hot water into the bowl. Transfer the dough to a floured work surface and knead for about 10 minutes, until the dough is elastic and compact. Place in a well-greased bowl, cover and let sit for 10 minutes.
2. Turn the dough out onto the work surface and divide it into 10 small, equal-sized balls. Roll these out with a rolling pin to a thickness of 1/4 inch (5 mm) each.
3. Heat a iron skillet (or in my case, a frying pan) and when it is hot, cook the tortillas for about 1 minute on each side (until it looks kind of bubbly and brown spots start to appear). Remove from heat and set aside until needed.

Anyway, it's getting to be an expensive craving to fulfill regularly because I live a good 35 kuai taxi ride away from the Sanlitun branch in Beijing. So, on a boring weekend afternoon, I decided to try and reinvent something more economical. This is what I came up with...
The Oriental Veggie Wrappo

Ingredients:
2 flour tortillas (see recipe that follows if you too, have a lot of time and flour in your hands)
For the filling
1/2 large carrot, peeled
2 stalks celery
2 cubes five-spice dried bean curd
1/2 cup enoki Mushrooms
1/2 red bell pepper
1/2 cup bamboo shoots (packaged, ready to eat)
1/2 tsp soy sauce
1/2 tsp sesame oil
2 tsp olive oil
1. Julienne the carrot, celery, bean curd and bamboo shoots into thin strips/matchsticks. Slice slice and slice away! Then, set aside.
2. Roast Bell Peppers and Enoki Mushrooms*:
Preheat oven to 230 C. Slice the bell pepper into strips and coat with 1 tsp olive oil. In a bowl, rub the enoki mushrooms with 1 tsp olive oil, sesame oil and soy sauce. Spread pepper and mushrooms in a single layer on a baking sheet, place on baking sheet and bake for 10-15 minutes until mushrooms are cooked and bell peppers are slightly browned. Allow to cool before using.
3. Spread the ingredients evenly on your tortillas. Roll up each tortilla and cut each rolled wrap in half diagonally. Enjoy.
*Alternatively, you can just stir fry them if you're in a rush, or if you like to eat your peppers raw, you can skip this~~

Note: The dried bean curd I bought was extremely flavorful and salty, so I didn't need to use much seasonings for the other veggies.
Homemade Flour Tortillas
From Classic Breads: Delicious Recipes from All Around the World
Original Recipe makes 10 tortillas, but mine were a little big so I got 7...
5 cups + 650g all purpose flour
2 1/4 tsp dry yeast
1/2 tsp salt
2 tbsp margarine
1 cup + 370 g hot water
1. Mix in flour, yeast and salt in a bowl. Add the margarine (I formed some crumbs with my fingers)and slowly pour the hot water into the bowl. Transfer the dough to a floured work surface and knead for about 10 minutes, until the dough is elastic and compact. Place in a well-greased bowl, cover and let sit for 10 minutes.
2. Turn the dough out onto the work surface and divide it into 10 small, equal-sized balls. Roll these out with a rolling pin to a thickness of 1/4 inch (5 mm) each.
3. Heat a iron skillet (or in my case, a frying pan) and when it is hot, cook the tortillas for about 1 minute on each side (until it looks kind of bubbly and brown spots start to appear). Remove from heat and set aside until needed.

Friday, April 23, 2010
Visual Delights: Peanut Butter Chocolate Cake
Saturday, May 16, 2009
Sunday, May 10, 2009
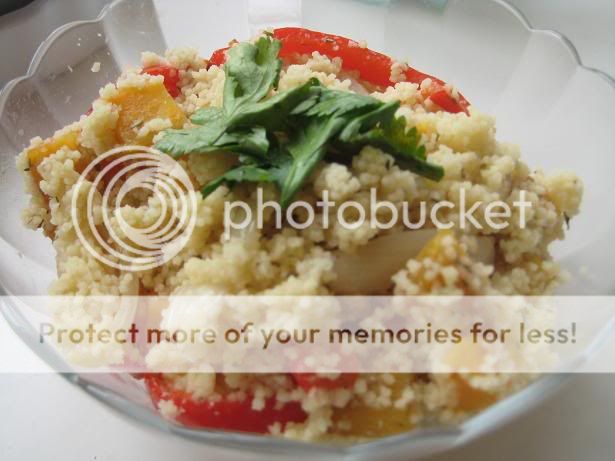
Roasted Vegetable Couscous
It would appear that my addiction to nuts and seeds is beginning to fade and I am now on some kind of grain eating spree-which I suppose isn't a bad thing, I'm guessing grains are lower in fat and that's what I'm aiming for.
Anyway, after milling about Carrefour after a dance class yesterday (which by the way, is a horrible weekend activity in China, it is crazy packed and everyone's yelling and snatching vegetables and blocking the aisles with their shopping carts-Carrefour I mean, not the dance class)I bought some brown rice and couscous,assuming that these would be healthier options to satisfy my new eating preferences.
Couscous are about 176 calories a cup cooked, so I don't feel THAT much carb guilt, even they they are supposedly not "whole grain" but "refined, processed grains".
I kind of like them because they are so easy to cook (just add water!).
This recipe is an inspiration from something I found on Sanitarium's website, except I've modified it to the point where I don't think it's much of a salad anymore.

This is pretty good with a sprinkle of parmesan cheese
Roasted Vegetable Couscous
½ medium sized red pepper, sliced
½ medium sized onion, sliced
½ sweet potato, cut into small cubes
½ small carrot, cut into cubes
1 tablespoon olive oil
1 teaspoon balsamic vinegar
½ teaspoon rosemary
1 teaspoon thyme
Salt and pepper
½ cup couscous
½ cup water
2 teaspoons vegetable bouillon granules
Salt
Paprika
Fresh cilantro
1. Preheat oven to 200 degrees Celcuis. In a plastic container, combine peppers, sweet potatoes,carrots and onions. Pour in olive oil, vinegar, rosemary, thyme, salt and pepper. Cover the container and shake well, until vegetables are well coated. Roast for 20 minutes in the preheated oven, stirring every 10 minutes, or until vegetables are cooked through and browned.
2. Place couscous in a bowl. Dissolve granules in boiling water and pour over couscous. Cover and stand for 3 minutes until liquid is absorbed. Stir with fork.
3. Toss warm couscous and roasted vegetables together. Mix in salt and paprika according to your taste. Serve garnished with cilantro leaves.
Anyway, after milling about Carrefour after a dance class yesterday (which by the way, is a horrible weekend activity in China, it is crazy packed and everyone's yelling and snatching vegetables and blocking the aisles with their shopping carts-Carrefour I mean, not the dance class)I bought some brown rice and couscous,assuming that these would be healthier options to satisfy my new eating preferences.
Couscous are about 176 calories a cup cooked, so I don't feel THAT much carb guilt, even they they are supposedly not "whole grain" but "refined, processed grains".
I kind of like them because they are so easy to cook (just add water!).
This recipe is an inspiration from something I found on Sanitarium's website, except I've modified it to the point where I don't think it's much of a salad anymore.
This is pretty good with a sprinkle of parmesan cheese
Roasted Vegetable Couscous
½ medium sized red pepper, sliced
½ medium sized onion, sliced
½ sweet potato, cut into small cubes
½ small carrot, cut into cubes
1 tablespoon olive oil
1 teaspoon balsamic vinegar
½ teaspoon rosemary
1 teaspoon thyme
Salt and pepper
½ cup couscous
½ cup water
2 teaspoons vegetable bouillon granules
Salt
Paprika
Fresh cilantro
1. Preheat oven to 200 degrees Celcuis. In a plastic container, combine peppers, sweet potatoes,carrots and onions. Pour in olive oil, vinegar, rosemary, thyme, salt and pepper. Cover the container and shake well, until vegetables are well coated. Roast for 20 minutes in the preheated oven, stirring every 10 minutes, or until vegetables are cooked through and browned.
2. Place couscous in a bowl. Dissolve granules in boiling water and pour over couscous. Cover and stand for 3 minutes until liquid is absorbed. Stir with fork.
3. Toss warm couscous and roasted vegetables together. Mix in salt and paprika according to your taste. Serve garnished with cilantro leaves.
Friday, May 8, 2009
Roasted Tomato Rice Salad
So I'm trying to eat healthier now (ignore the previous post with cinnamon rolls), by eating less fat during the day and less carbs and fat for dinner.
Learning to cook rice (and eat them) has opened up the doors to a bunch of new recipes. One of which I really wanted to try was the rice salad.
The concept of rice in a salad is kind of weird for me, and yet, so novel enough that it's almost intriguing. (yes, i am aware that i am a moron who has never heard of rice salad before)
I couldn't find any good recipes that didn't include salad dressing-which I don't have-so I ended up improvising from a roasted tomato salad recipe instead.

Roasted Tomato Rice Salad
1 big tomato
1/2 onion, sliced
1 clove garlic, chopped
1 tablespoon dried basil
3/4 cup cooked rice (cooled)
2 tablespoons sunflower seeds
1 teaspoon raisins
3 teaspoons olive oil
1 teaspoon red wine vinegar
1/4 teaspoon sugar
1 teaspoon dark sesame oil
1/2 teaspoon salt
1/2 teaspoon pepper
1.Slice tomato lengthwise into three pieces.
2.Preheat the oven to 200 degrees C (392 degrees F). Combine the 2 teaspoons olive oil, garlic, basil, salt and pepper in a bowl, add onions and tomatoes and toss lightly until coated.
3.Place a piece of tin foil on your roasting pan, arrange onions in the base and place tomatoes on top of the onions. Fold up the sides of the tin foil to cover the vegetables.
4.Roast for about 20 minutes. When the tomatoes are soft, remove from the oven, discard the excessive juice and transfer to a serving dish.
5.In another bowl, mix together rice, seeds, raisins, 1 teaspoon olive oil, vinegar, sesame oil, sugar and salt. Pour over tomatoes in the dish and serve-or-if you want to make a rice tower thingie, use a piece of tomato as the base, then add a layer of onions, then a layer of rice (and so on). It’s a cute presentation~
Learning to cook rice (and eat them) has opened up the doors to a bunch of new recipes. One of which I really wanted to try was the rice salad.
The concept of rice in a salad is kind of weird for me, and yet, so novel enough that it's almost intriguing. (yes, i am aware that i am a moron who has never heard of rice salad before)
I couldn't find any good recipes that didn't include salad dressing-which I don't have-so I ended up improvising from a roasted tomato salad recipe instead.
Roasted Tomato Rice Salad
1 big tomato
1/2 onion, sliced
1 clove garlic, chopped
1 tablespoon dried basil
3/4 cup cooked rice (cooled)
2 tablespoons sunflower seeds
1 teaspoon raisins
3 teaspoons olive oil
1 teaspoon red wine vinegar
1/4 teaspoon sugar
1 teaspoon dark sesame oil
1/2 teaspoon salt
1/2 teaspoon pepper
1.Slice tomato lengthwise into three pieces.
2.Preheat the oven to 200 degrees C (392 degrees F). Combine the 2 teaspoons olive oil, garlic, basil, salt and pepper in a bowl, add onions and tomatoes and toss lightly until coated.
3.Place a piece of tin foil on your roasting pan, arrange onions in the base and place tomatoes on top of the onions. Fold up the sides of the tin foil to cover the vegetables.
4.Roast for about 20 minutes. When the tomatoes are soft, remove from the oven, discard the excessive juice and transfer to a serving dish.
5.In another bowl, mix together rice, seeds, raisins, 1 teaspoon olive oil, vinegar, sesame oil, sugar and salt. Pour over tomatoes in the dish and serve-or-if you want to make a rice tower thingie, use a piece of tomato as the base, then add a layer of onions, then a layer of rice (and so on). It’s a cute presentation~
Thursday, May 7, 2009
You know...
You know you're not sick anymore when you have the energy to bake cinnamon sticky rolls...and eat them.
Tuesday, May 5, 2009
Porridge for the sick girl
What's this?! you sneer, this colorless, unpretty bowl of carbs, what is it doing here, displayed for all the world to see?
Well, this happens to be the only thing I could actually stomach for the past 5 days: a bowl of porridge (or "congee" I suppose).
Basically I've had a nasty stomach virus since last Wednesday night (which was ironic, because that was the day I had planned to start my latest diet) and...well...you don't want to know the details of that but the point is my stomach refused everything I fed it, plus it hurt like a bitch all the time.
It occurred to me around the third day that it might help to bland down my foods-after trial and error with Indian food, and later with white wine and random street food-and I was finally sensible enough to cook a pot of porridge.
Unlike some people who hate porridge (like my best friend, who associates it with being sick), I used to love porridge and could and did, at one point, eat it for every meal during high school.
Unfortunately, being the carb wuss that I have been, rice has been off my diet for quite a long time, as far back as before I started cooking, and well...the truth is...I don't know how to and have never successfully cooked rice. I don't know how to use a rice steamer. In fact, I may or may not have tried to microwave rice about 2 years ago, and that did not end well-unless you like crispy, crunchy (and slightly burnt) rice, which now that I think about it, wouldn't be that bad really.
The funny thing is, I was miraculously successful with congee on my first attempt.
Mustering up every last bit of breath in me (or what felt like it), I threw less than a cup of rice (bought at some point by my housemate), a piece of ginger, 2 shiitake mushrooms and some spring onions in a big pot, filled it up to almost the brim with water, boiled it and let it simmer for about 40 minutes while I went to lie down. When it was done, I added plenty of salt and pepper and feasted like a sick person.
I don't know if it was the fact that it was warm or bland or liquid-or all of the above, but it was fantastic for my tummy and it was nice to revisit something I haven't had for such a long time.
The next time I made it, I grated half a carrot and half a turnip in about 20 minutes into the simmering, it was yummy.
NOW ON A SIDE NOTE
-and I stumbled upon this while googling the word 白粥, which is plain porridge-
There is a porridge weight loss plan-which really doesn't sound all that bad-not that I would try it, non of these things sound very exciting to cook, plus get-skinny-quick diets have never worked for me in the past. But anyway, apparently,you could potentially lose 4-6 pounds in 3 days eating congee.
The Congee Diet
Day 1
Breakfast: Plain congee, 1 mantou (steamed bun)
Lunch: Plain congee, 1 boiled egg
Dinner: Plain congee, 1 plate stir fried vegetables
Day 2:
Breakfast: Plain congee, 1 sesame paste bun
Lunch: Plain congee, 1 boiled egg
Dinner: Plain congee, 1 plate stir fried vegetables
Day 3
Breakfast: Plain congee, 5 pieces chocolate biscuits
Lunch: Plain congee, 1 raisin bun
Dinner: Plain congee, 1 plate stir fried vegetables
Apparently you can eat all the congee you like as long as you don’t add on the other food.
Apparently it is good for detox.
Apparently it might cause a bad reaction with your stomach.
Meh.If anything all my past diet attempts have made me, if not skinnier, is a skeptic.
Tuesday, April 28, 2009
Bamboo Shoots
To make it a little more relevant, my recipe today is based on bamboo shoots, one of the giant panda's food of choice.
Bamboo shoots are lovely little things.
They are high in fiber and really good stuff for the digestive system(they help relief constipation to a degree) It is also said that they decrease the amount of fat absorbed in the intestines.
They work well for dieters because they are low-starch, low-sugar and low-fat. 100 grams of fresh bamboo shoots amounts to 40 calories with 0.1 grams fat.
(If you're wondering why there aren't many skinny pandas around, my guess is it's because their lives are pampered and because they don't move)
Braised Bamboo Shoots
2 pieces packaged bamboo shoots
1/2 a carrot
5-6 dried shiitake mushrooms
1 spring onion, chopped into short sections
1 tablespoon minced ginger
1 tablespoon oil
2 tablespoons soy sauce
1/2 tablespoon cooking wine
1/2 teaspoon sugar
1/2 teaspoon white pepper
1/2 teaspoon Szechuan hot pepper oil (optional)
1. Chop bamboo shoots and carrot into bite sized pieces. Marinade bamboo pieces with 1 tablespoon soy sauce.
2.Soak mushrooms in a bowl of warm water until softened. Reserve liquid.
3. In a pan, heat oil and fry ginger, onions and mushrooms over moderate heat.
Pour in 3/4 cup mushroom water. Add soy sauce, cooking wine, sugar and pepper, bring liquid to a boil. Add carrots and bamboo shoots, cover and simmer for 10 minutes until most of the liquid has dried up. Drizzle some hot pepper oil if you want a little spice to it.
Notes: If you are using fresh bamboo shoots, you'll probably want to boil them in salted water for about 10 minutes before using them.
Bamboo shoots are lovely little things.
They are high in fiber and really good stuff for the digestive system(they help relief constipation to a degree) It is also said that they decrease the amount of fat absorbed in the intestines.
They work well for dieters because they are low-starch, low-sugar and low-fat. 100 grams of fresh bamboo shoots amounts to 40 calories with 0.1 grams fat.
(If you're wondering why there aren't many skinny pandas around, my guess is it's because their lives are pampered and because they don't move)
Braised Bamboo Shoots
2 pieces packaged bamboo shoots
1/2 a carrot
5-6 dried shiitake mushrooms
1 spring onion, chopped into short sections
1 tablespoon minced ginger
1 tablespoon oil
2 tablespoons soy sauce
1/2 tablespoon cooking wine
1/2 teaspoon sugar
1/2 teaspoon white pepper
1/2 teaspoon Szechuan hot pepper oil (optional)
1. Chop bamboo shoots and carrot into bite sized pieces. Marinade bamboo pieces with 1 tablespoon soy sauce.
2.Soak mushrooms in a bowl of warm water until softened. Reserve liquid.
3. In a pan, heat oil and fry ginger, onions and mushrooms over moderate heat.
Pour in 3/4 cup mushroom water. Add soy sauce, cooking wine, sugar and pepper, bring liquid to a boil. Add carrots and bamboo shoots, cover and simmer for 10 minutes until most of the liquid has dried up. Drizzle some hot pepper oil if you want a little spice to it.
Notes: If you are using fresh bamboo shoots, you'll probably want to boil them in salted water for about 10 minutes before using them.
Talia hearts pandas
I've decided that this is going to be a tribute post to giant pandas. (even if this is supposedly a cooking blog)

LOOK at this face and tell me it isn't the cutest thing on Earth.
I love pandas. One of my biggest dreams to one day encounter a wild panda. However, friends and acquaintances from Sichuan have informed me that climbing off into a random mountain in that province would unlikely generate any results.
They are probably the most spoiled animals on the planet...and the laziest...but the idea that a species that would have easily gone extinct survived for such a long time simply by looking cute fascinates me to no end.
Honestly, had they been slimy or nasty looking, I'll bet they would have died off ages ago.
Instead, pandas get treated like total rock stars. They travel in private jets. They eat special food. Everyone wants their picture taken with them. Plus, the media eats it all up when they give birth to babies.

THANK YOU WWF for your efforts to preserve awesomeness
LOOK at this face and tell me it isn't the cutest thing on Earth.
I love pandas. One of my biggest dreams to one day encounter a wild panda. However, friends and acquaintances from Sichuan have informed me that climbing off into a random mountain in that province would unlikely generate any results.
They are probably the most spoiled animals on the planet...and the laziest...but the idea that a species that would have easily gone extinct survived for such a long time simply by looking cute fascinates me to no end.
Honestly, had they been slimy or nasty looking, I'll bet they would have died off ages ago.
Instead, pandas get treated like total rock stars. They travel in private jets. They eat special food. Everyone wants their picture taken with them. Plus, the media eats it all up when they give birth to babies.
THANK YOU WWF for your efforts to preserve awesomeness
Monday, April 27, 2009
Green Baos and Eggs
Jiaozis (饺子) have never been one of my culinary strengths-which is weird, considering the fact that dumplings were the only thing my mom would let me help out with in the kitchen (besides peeling carrots and hard boiled eggs).
When I was really little, my mom would let me press down the dumpling skin dough before she rolled it out with a rolling pin. (she happens to be very proud of her dumpling skin rolling skills by the way, as is my grandmother)
When I got good at that, I was allowed to help fold the dumplings. Though despite years of experience, my dumplings still look hideous and are always easily recognizable when brought out to the dinner table ("oh, those two ugly ones are the ones Talia made, who will eat them...*pause*... why don't YOU eat them, Talia?")
About 4 years ago, when I was spending two months with my grandfather in Xinjiang, I attempted to make the dumpling skin from scratch for him and it ended up so hard that he promptly flattened them and cut them up into noodles instead.
Personally I'm not a big fan of dumplings on account of the carb factor and everything. Plus I feel kind of jinxed.
However, considering how everything's starting to get busy, I thought it would be a good idea to freeze some for a quick lunch or dinner.
I found a recipe for dumpling skin that replaced water with spinach juice instead, which I felt was healthier. I didn't have the ingredients my grandmother usually uses for her vegetarian filling (mushrooms, rice noodles, tofu etc) so I used eggs and tomato instead.
Amazingly enough, the dough turned out alright. As did the filling.
It was rolling out the dough to make the skins that was hard. I had trouble making them nice and round, and I suspect I made them too thin.
My boyfriend came in after I'd rolled out a couple and offered to help.
His method was to roll out the dough as use a cup as a cookie cutter-which helped with the shape but not with the thickness.
Eventually, I accepted the fact that we weren't going to be able to make actual jiaozis with the skin we'd made, so we decided they were going to become baozis (包子) instead (their skins are slightly thicker)
They ended up tasting alright, albeit deformed. We ended up with less than 20 baozis/jiaozis (because some of the skin became unusable) and finished them for dinner so I didn't have any to freeze after all.
If I ever try to make jiaozis again I will probably just buy the ready made skin. It saves alot of time even if I question the nutrition value ><
Anyway, I've tried to describe the recipe the best I can here, I expect a more expert dumpling skin maker would get better results than I did with this.
Steamed Tomato Egg Dumplings
Wrappers
300 grams fresh spinach, washed
1 ½ cups whole wheat flour
¼ teaspoon salt
Filling
2 eggs
1 big tomato
1 piece spring onion, chopped finely
1 teaspoon sugar
1 1/2 teaspoons soy sauce
1 teaspoon sesame oil
½ teaspoon white pepper
To make spinach dumpling skins:
1.Juice spinach to make roughly 130 ml spinach juice.
2.In a bowl, combine flour and salt. Pour in spinach juice and mix with a spoon until a soft dough forms (it’s very sticky so don’t be tempted to use your hands just yet). Keep adding flour until the dough can be worked with your hands.
3.Turn out the dough on a floured surface and knead it into a smooth ball. Cover the dough with a wet towel and let it rest for 15-30 minutes.
4.Cut the dough snake into around 25 pieces using a knife. Flatten each ball of dough with your palm and cover each with enough flour to prevent sticking.
5.Roll each piece out into a circle about 3-inches in diameter using a rolling pin, making the edges thinner than the center.* Dust the dumpling skins with flour if you stack them or they will stick together.
To make the filling: Place tomato in boiled water for 20 seconds and peel off the skin. Chop tomato into small chunks, discard juice and set aside. Beat two eggs and ¼ teaspoon soy sauce in a bowl. Scramble eggs in a non stick pan. Combine eggs, tomatoes, spring onions, sugar, soy sauce, sesame oil and pepper in a bowl.
To make the dumplings: Put about 1 tablespoon of the filling in the center of each skin, holding the skin in the palm of one hand. Wet the edges with water, then seal the edges with 2-3 pleats on each side and transfer to a lightly floured plate or tray.
To steam dumplings: Place as many dumplings as you can into a steamer, without touching each other. Cover and steam for 10 to 12 minutes over medium heat. Serve warm with your favorite dumpling dipping sauce.


For an American and a banana, we didn't do so bad. Really!
When I was really little, my mom would let me press down the dumpling skin dough before she rolled it out with a rolling pin. (she happens to be very proud of her dumpling skin rolling skills by the way, as is my grandmother)
When I got good at that, I was allowed to help fold the dumplings. Though despite years of experience, my dumplings still look hideous and are always easily recognizable when brought out to the dinner table ("oh, those two ugly ones are the ones Talia made, who will eat them...*pause*... why don't YOU eat them, Talia?")
About 4 years ago, when I was spending two months with my grandfather in Xinjiang, I attempted to make the dumpling skin from scratch for him and it ended up so hard that he promptly flattened them and cut them up into noodles instead.
Personally I'm not a big fan of dumplings on account of the carb factor and everything. Plus I feel kind of jinxed.
However, considering how everything's starting to get busy, I thought it would be a good idea to freeze some for a quick lunch or dinner.
I found a recipe for dumpling skin that replaced water with spinach juice instead, which I felt was healthier. I didn't have the ingredients my grandmother usually uses for her vegetarian filling (mushrooms, rice noodles, tofu etc) so I used eggs and tomato instead.
Amazingly enough, the dough turned out alright. As did the filling.
It was rolling out the dough to make the skins that was hard. I had trouble making them nice and round, and I suspect I made them too thin.
My boyfriend came in after I'd rolled out a couple and offered to help.
His method was to roll out the dough as use a cup as a cookie cutter-which helped with the shape but not with the thickness.
Eventually, I accepted the fact that we weren't going to be able to make actual jiaozis with the skin we'd made, so we decided they were going to become baozis (包子) instead (their skins are slightly thicker)
They ended up tasting alright, albeit deformed. We ended up with less than 20 baozis/jiaozis (because some of the skin became unusable) and finished them for dinner so I didn't have any to freeze after all.
If I ever try to make jiaozis again I will probably just buy the ready made skin. It saves alot of time even if I question the nutrition value ><
Anyway, I've tried to describe the recipe the best I can here, I expect a more expert dumpling skin maker would get better results than I did with this.
Steamed Tomato Egg Dumplings
Wrappers
300 grams fresh spinach, washed
1 ½ cups whole wheat flour
¼ teaspoon salt
Filling
2 eggs
1 big tomato
1 piece spring onion, chopped finely
1 teaspoon sugar
1 1/2 teaspoons soy sauce
1 teaspoon sesame oil
½ teaspoon white pepper
To make spinach dumpling skins:
1.Juice spinach to make roughly 130 ml spinach juice.
2.In a bowl, combine flour and salt. Pour in spinach juice and mix with a spoon until a soft dough forms (it’s very sticky so don’t be tempted to use your hands just yet). Keep adding flour until the dough can be worked with your hands.
3.Turn out the dough on a floured surface and knead it into a smooth ball. Cover the dough with a wet towel and let it rest for 15-30 minutes.
4.Cut the dough snake into around 25 pieces using a knife. Flatten each ball of dough with your palm and cover each with enough flour to prevent sticking.
5.Roll each piece out into a circle about 3-inches in diameter using a rolling pin, making the edges thinner than the center.* Dust the dumpling skins with flour if you stack them or they will stick together.
To make the filling: Place tomato in boiled water for 20 seconds and peel off the skin. Chop tomato into small chunks, discard juice and set aside. Beat two eggs and ¼ teaspoon soy sauce in a bowl. Scramble eggs in a non stick pan. Combine eggs, tomatoes, spring onions, sugar, soy sauce, sesame oil and pepper in a bowl.
To make the dumplings: Put about 1 tablespoon of the filling in the center of each skin, holding the skin in the palm of one hand. Wet the edges with water, then seal the edges with 2-3 pleats on each side and transfer to a lightly floured plate or tray.
To steam dumplings: Place as many dumplings as you can into a steamer, without touching each other. Cover and steam for 10 to 12 minutes over medium heat. Serve warm with your favorite dumpling dipping sauce.
For an American and a banana, we didn't do so bad. Really!
Sunday, April 26, 2009
Two days of kao fu
So I was at the dried foods section at the Lotus supermarket grabbing a packet of jujubes when I spied something that looked strangely familiar. A closer examination of the label informed me that this was a packet of sea kelp-but I knew better!

This was no sea kelp!!!
I recognized it as "kao fu" (烤麸), something I had seen at the dinner table but once in my life. If I recall correctly, my mom had tried to get me to try some and I had refused like a little brat.
The texture reminded me of frozen tofu because it is spongy. (which makes it a high risk to pop it in your mouth when it is soaking with hot liquid-but that is another story). Anyway, seeing it there and then filled me with curiosity as I never quite learned of its taste so I decided to take it with me (for 3.14 kuai)
At home, I wasn't entirely sure what to do with my new plaything (which according to whoever wrote it on wikipedia, is called "baked spongy gluten" in English).
I'd found a recipe that resembled the dish I'd seen that fateful day but wasn't quite sure how to cut it.

Here's a tip: Boil first, cut later. I learned the messy way.
Here's what I made ^^
"Honey Braised" Kao Fu
100 grams baked gluten
½ cup peanuts
10 grams black wood ear fungus
5 grams shiitake mushrooms
10 grams dried daylilies
2 tablespoons vegetable oil
Minced ginger
1 tablespoon brown sugar
1½ tablespoons dark soy sauce
½ teaspoon light soy sauce
1 clove
1/4 cup water
1 teaspoon sesame oil
1.Soak wood ear fungus, daylilies and shiitake mushrooms in a bowl of water until softened. Cut mushrooms into bite sized slices and set aside.
2.Place gluten and peanuts in a pot, add just enough water to cover. Bring to a boil, remove gluten (using chopsticks or something) and continue to boil peanuts for about 15 minutes(it takes a while for them to become soft, just add more water when needed).
3.Place gluten in cold water, then squeeze dry and into bite sized cubes.
4.Heat oil in a pan and fry the gluten until slightly browned and crispy. Remove gluten from pan.
5.Heat oil in pan, add ginger and fry until fragrant. Add fungus, lilies, mushrooms and stir fry for 1 minute. Add gluten pieces and peanuts. Then add 1/2 tablespoon sugar, soy sauce, cloves and water. Bring water to a boil and reduce heat. Add the remaining sugar. Cover and braise for 20 minutes until it is no longer watery. Turn off heat and drizzle in sesame oil.
Notes:
-This dish is normally eaten cold but eating is warm is nice too
-I read on a Chinese site that the cloves are used to give the dish a hint of a honey-like taste. They can be replaced with a star anise.
-Mine didn't turn out completely authentic because you're supposed to really deep fry the gluten in step 4, I just can't quite bring myself to do it ><. Also I didn't have daylilies so I had to use enoki mushrooms instead

I've found kao fu to be a pretty versatile ingredient. You can use some in a stir fry with your favorite vegetables to add protein to the dish...which is what I did with my leftover ones.
Mixed Vegetables Stir Fry with Kao Fu
1 block kao fu
1 bamboo shoot, sliced
1/2 a broccoli, cut into bite sized pieces
1/2 a carrot, sliced
3 green beans, cut into 4 cm pieces
1 piece black fungus, sliced
1/2 a tomato, sliced
2 tablespoons olive oil
1 clove garlic
1/2 cup vegetable stock
1 tablespoon soy sauce
3 tablespoons oyster sauce
1/2 teaspoon white pepper
goji berries (optional)
1. Soak gluten in boiled water until softened. Squeeze dry and cut into bite sized chunks. Set aside.
2. Heat oil in a wok. Add garlic and tomato and stir well. Add veggies and gluten all at once. Add some goji berries too, if you like. Stir fry for 3 minutes, pour in stock and bring to a boil.
3. Reduce heat and cook vegetables until tender but slightly crisp. Add oyster sauce, soy sauce and sprinkle with pepper. Stir well and cook for another minute before serving.

More kao fu information:
Kao fu is made by leavening raw gluten. It's high protein and low sugar, low fat.
100 grams of kao fu amounts to 121 calories, 20.4 g protein and 0.3 grams fat.
This was no sea kelp!!!
I recognized it as "kao fu" (烤麸), something I had seen at the dinner table but once in my life. If I recall correctly, my mom had tried to get me to try some and I had refused like a little brat.
The texture reminded me of frozen tofu because it is spongy. (which makes it a high risk to pop it in your mouth when it is soaking with hot liquid-but that is another story). Anyway, seeing it there and then filled me with curiosity as I never quite learned of its taste so I decided to take it with me (for 3.14 kuai)
At home, I wasn't entirely sure what to do with my new plaything (which according to whoever wrote it on wikipedia, is called "baked spongy gluten" in English).
I'd found a recipe that resembled the dish I'd seen that fateful day but wasn't quite sure how to cut it.
Here's a tip: Boil first, cut later. I learned the messy way.
Here's what I made ^^
"Honey Braised" Kao Fu
100 grams baked gluten
½ cup peanuts
10 grams black wood ear fungus
5 grams shiitake mushrooms
10 grams dried daylilies
2 tablespoons vegetable oil
Minced ginger
1 tablespoon brown sugar
1½ tablespoons dark soy sauce
½ teaspoon light soy sauce
1 clove
1/4 cup water
1 teaspoon sesame oil
1.Soak wood ear fungus, daylilies and shiitake mushrooms in a bowl of water until softened. Cut mushrooms into bite sized slices and set aside.
2.Place gluten and peanuts in a pot, add just enough water to cover. Bring to a boil, remove gluten (using chopsticks or something) and continue to boil peanuts for about 15 minutes(it takes a while for them to become soft, just add more water when needed).
3.Place gluten in cold water, then squeeze dry and into bite sized cubes.
4.Heat oil in a pan and fry the gluten until slightly browned and crispy. Remove gluten from pan.
5.Heat oil in pan, add ginger and fry until fragrant. Add fungus, lilies, mushrooms and stir fry for 1 minute. Add gluten pieces and peanuts. Then add 1/2 tablespoon sugar, soy sauce, cloves and water. Bring water to a boil and reduce heat. Add the remaining sugar. Cover and braise for 20 minutes until it is no longer watery. Turn off heat and drizzle in sesame oil.
Notes:
-This dish is normally eaten cold but eating is warm is nice too
-I read on a Chinese site that the cloves are used to give the dish a hint of a honey-like taste. They can be replaced with a star anise.
-Mine didn't turn out completely authentic because you're supposed to really deep fry the gluten in step 4, I just can't quite bring myself to do it ><. Also I didn't have daylilies so I had to use enoki mushrooms instead
I've found kao fu to be a pretty versatile ingredient. You can use some in a stir fry with your favorite vegetables to add protein to the dish...which is what I did with my leftover ones.
Mixed Vegetables Stir Fry with Kao Fu
1 block kao fu
1 bamboo shoot, sliced
1/2 a broccoli, cut into bite sized pieces
1/2 a carrot, sliced
3 green beans, cut into 4 cm pieces
1 piece black fungus, sliced
1/2 a tomato, sliced
2 tablespoons olive oil
1 clove garlic
1/2 cup vegetable stock
1 tablespoon soy sauce
3 tablespoons oyster sauce
1/2 teaspoon white pepper
goji berries (optional)
1. Soak gluten in boiled water until softened. Squeeze dry and cut into bite sized chunks. Set aside.
2. Heat oil in a wok. Add garlic and tomato and stir well. Add veggies and gluten all at once. Add some goji berries too, if you like. Stir fry for 3 minutes, pour in stock and bring to a boil.
3. Reduce heat and cook vegetables until tender but slightly crisp. Add oyster sauce, soy sauce and sprinkle with pepper. Stir well and cook for another minute before serving.
More kao fu information:
Kao fu is made by leavening raw gluten. It's high protein and low sugar, low fat.
100 grams of kao fu amounts to 121 calories, 20.4 g protein and 0.3 grams fat.
Saturday, April 25, 2009
Talia bakes a cake and a cupcake
I was surprised to find carrot cake categorized under "kid friendly" recipes on allrecipes.com.
As a child, I'd seen carrot cakes in cake display cabinets and always imagined them to be yucky.
Don't get me wrong, I love carrots. I was brought up to believe that carrots would make my eyesight stay as sharp as a bunny rabbit's. My mother even reinforced this belief by telling me, at the dinner table, the tales of Little Rabbit who liked to eat carrot dishes not unlike the ones she made.
My point is, Little Rabbit-my carrot chomping role model- never ate no carrot cake. He had em' in soups, in roasts, boiled, steamed, even mashed but never as a dessert. I always imagined that carrots were meant to be savory, which is why I've never eaten a carrot cake before...until today.
Since I love spices so much, my boyfriend had mentioned that I might like it. So I found this recipe, with over 1,600 reviews on allrecipes.com (which I suppose, means at least 2,000 people have probably thought that this recipe was worth trying).
I have to admit, I still had my doubts as I mixed the batter...

....but the first bite of the warm, vitamin A packed sweet and spiciness changed my mind

Carrot Cake
-adapted from allrecipes.com-
¾ cup brown sugar
1 tablespoon white sugar
½ cup olive oil (or vegetable oil)
2 eggs
2 teaspoons vanilla extract
1 cup all-purpose flour
1 teaspoon baking soda
1 teaspoon baking powder
1/4 teaspoon salt
2 teaspoons ground cinnamon
½ teaspoon ground nutmeg
1-1/2 cups grated carrots (I used 2 carrots)
1/2 cup raisins
1.Grate carrots, soak raisins in hot water, set both aside.
2.Preheat oven to 175 degrees C (350 degrees F).
3.In a large bowl, mix sugars with oil, beat in eggs, and vanilla. Combine flour, baking soda, baking powder, salt, nutmeg and cinnamon. Stir dry ingredients into the wet mixture. Stir in carrots.
4.Squeeze water from raisins and fold into the batter. Pour into prepared pan.
5.Bake in the preheated oven for 40 to 50 minutes, or until a toothpick inserted into the center of the cake comes out clean. Let cool in pan for 10 minutes, then turn out onto a wire rack and cool completely
Note: The recipe comes with a cream cheese frosting which I skipped because I neither like nor possess any of the stuff

I baked mine in a dish and had some some batter leftover to fill a cupcake cup.
As a child, I'd seen carrot cakes in cake display cabinets and always imagined them to be yucky.
Don't get me wrong, I love carrots. I was brought up to believe that carrots would make my eyesight stay as sharp as a bunny rabbit's. My mother even reinforced this belief by telling me, at the dinner table, the tales of Little Rabbit who liked to eat carrot dishes not unlike the ones she made.
My point is, Little Rabbit-my carrot chomping role model- never ate no carrot cake. He had em' in soups, in roasts, boiled, steamed, even mashed but never as a dessert. I always imagined that carrots were meant to be savory, which is why I've never eaten a carrot cake before...until today.
Since I love spices so much, my boyfriend had mentioned that I might like it. So I found this recipe, with over 1,600 reviews on allrecipes.com (which I suppose, means at least 2,000 people have probably thought that this recipe was worth trying).
I have to admit, I still had my doubts as I mixed the batter...
....but the first bite of the warm, vitamin A packed sweet and spiciness changed my mind
Carrot Cake
-adapted from allrecipes.com-
¾ cup brown sugar
1 tablespoon white sugar
½ cup olive oil (or vegetable oil)
2 eggs
2 teaspoons vanilla extract
1 cup all-purpose flour
1 teaspoon baking soda
1 teaspoon baking powder
1/4 teaspoon salt
2 teaspoons ground cinnamon
½ teaspoon ground nutmeg
1-1/2 cups grated carrots (I used 2 carrots)
1/2 cup raisins
1.Grate carrots, soak raisins in hot water, set both aside.
2.Preheat oven to 175 degrees C (350 degrees F).
3.In a large bowl, mix sugars with oil, beat in eggs, and vanilla. Combine flour, baking soda, baking powder, salt, nutmeg and cinnamon. Stir dry ingredients into the wet mixture. Stir in carrots.
4.Squeeze water from raisins and fold into the batter. Pour into prepared pan.
5.Bake in the preheated oven for 40 to 50 minutes, or until a toothpick inserted into the center of the cake comes out clean. Let cool in pan for 10 minutes, then turn out onto a wire rack and cool completely
Note: The recipe comes with a cream cheese frosting which I skipped because I neither like nor possess any of the stuff
I baked mine in a dish and had some some batter leftover to fill a cupcake cup.
Friday, April 24, 2009
cookies and flowers
It's been a really long, rough week for both my boyfriend and me. After my class finished on Friday, I thought I'd bake some chocolate chip cookies to cheer him up.
Just as I was going to pop them into the oven, the door clicked...
he'd brought a bunch of roses for me because he wanted me to feel better.

Life can be so cute

almost like an O Henry story, with less loss and more awwww
*Edit*
Boyfriend loved the cookies a lot and suggested I put up the recipe here:
Soft Chocolate Chip Cookies
-modified from allrecipes
2-1/4 cups all-purpose flour
1 teaspoon baking soda
½ teaspoon baking powder
1 stick butter, softened
2 tablespoons olive oil
1/4 teaspoon salt
3/4 cup packed brown sugar
1 tablespoon white sugar
1 (3.4 ounce) package instant vanilla pudding mix
2 eggs
1 teaspoon vanilla extract
½ teaspoon cinnamon
1 cup dark and milk chocolate chunks
1.Sift together the flour, baking soda, baking powder, cinnamon and salt. Set aside.
2.In a large bowl, cream together the butter, oil and sugars. Beat in the instant pudding mix until blended. Stir in the eggs and vanilla. Blend in the flour mixture. Finally, stir in the chocolate chunks.
3.Chill cookie dough for two hours or overnight.
4.Preheat oven to 175 degrees C (350 degrees F ). Drop cookies by rounded spoonfuls onto ungreased cookie sheets. Bake for 10 minutes in the preheated oven. Edges should be golden brown. If you use butter, the cookies will probably spread.
Just as I was going to pop them into the oven, the door clicked...
he'd brought a bunch of roses for me because he wanted me to feel better.
Life can be so cute
almost like an O Henry story, with less loss and more awwww
*Edit*
Boyfriend loved the cookies a lot and suggested I put up the recipe here:
Soft Chocolate Chip Cookies
-modified from allrecipes
2-1/4 cups all-purpose flour
1 teaspoon baking soda
½ teaspoon baking powder
1 stick butter, softened
2 tablespoons olive oil
1/4 teaspoon salt
3/4 cup packed brown sugar
1 tablespoon white sugar
1 (3.4 ounce) package instant vanilla pudding mix
2 eggs
1 teaspoon vanilla extract
½ teaspoon cinnamon
1 cup dark and milk chocolate chunks
1.Sift together the flour, baking soda, baking powder, cinnamon and salt. Set aside.
2.In a large bowl, cream together the butter, oil and sugars. Beat in the instant pudding mix until blended. Stir in the eggs and vanilla. Blend in the flour mixture. Finally, stir in the chocolate chunks.
3.Chill cookie dough for two hours or overnight.
4.Preheat oven to 175 degrees C (350 degrees F ). Drop cookies by rounded spoonfuls onto ungreased cookie sheets. Bake for 10 minutes in the preheated oven. Edges should be golden brown. If you use butter, the cookies will probably spread.
Tuesday, April 21, 2009
Strawberry Bread
I can't believe we ate up the apple bread in 2 days. It was good stuff and I was eager to fill the bread box up again as soon as the last crumb had been devoured (by me).
The concept of adding strawberries to bread is one that is quite new to me, but they are still in season and the recipe that I found from joyofbaking.com looked so easy that I decided to try it out.
I love baking with spices, it makes the house smell really nice, plus the scent of cinnamon apparently helps boost brain activity and relaxes the tired mind. It also works effectively as an anti-depressant-just the smell I need to get through the midterms!

Strawberry Bread
-recipe from joyofbaking, with minor changes-
1/4 cup butter or olive oil
1 ripe banana
3/4 cup brown sugar
3 eggs
1 teaspoon vanilla extract
2 cups all-purpose flour
1/2 teaspoon baking powder
1/2 teaspoon baking soda
1/4 teaspoon salt
2 teaspoons ground cinnamon
1/2 cup plain yogurt
1 1/2 cups chopped fresh strawberries
1. Preheat oven to 180 degrees C (350 degrees F ) and place the oven rack in the middle position. Butter and flour the bottom and sides of your loaf pan. Set aside.
2. In a bowl, mash the banana with the sugar using a spoon (it’s almost like creaming it, but stickier),mix in the oil and vanilla. Then, beat in the eggs one at a time.
3. In another bowl, combine flour, baking powder, baking soda, salt, and ground cinnamon.
4. Add the flour mixture (in three additions) and yogurt (in two additions) to the wet mixture alternately, starting and ending with the flour. Mix only until combined. Gently fold in the chopped strawberries.
5. Pour the batter into the prepared pan and bake about one hour, or until the bread is golden brown and a toothpick inserted in the center comes out clean. Place on a wire rack to cool and then remove the bread from the pan. Serve warm or at room temperature.
Makes 1 loaf.

Note: Definitely bake this for at least 45 minutes, I took mine out a bit too early and the center was a bit gooey (I'm not complaining though). You also want to make sure you wash the strawberries thoroughly before you use them in China because they use quite a bit of pesticide
The concept of adding strawberries to bread is one that is quite new to me, but they are still in season and the recipe that I found from joyofbaking.com looked so easy that I decided to try it out.
I love baking with spices, it makes the house smell really nice, plus the scent of cinnamon apparently helps boost brain activity and relaxes the tired mind. It also works effectively as an anti-depressant-just the smell I need to get through the midterms!
Strawberry Bread
-recipe from joyofbaking, with minor changes-
1/4 cup butter or olive oil
1 ripe banana
3/4 cup brown sugar
3 eggs
1 teaspoon vanilla extract
2 cups all-purpose flour
1/2 teaspoon baking powder
1/2 teaspoon baking soda
1/4 teaspoon salt
2 teaspoons ground cinnamon
1/2 cup plain yogurt
1 1/2 cups chopped fresh strawberries
1. Preheat oven to 180 degrees C (350 degrees F ) and place the oven rack in the middle position. Butter and flour the bottom and sides of your loaf pan. Set aside.
2. In a bowl, mash the banana with the sugar using a spoon (it’s almost like creaming it, but stickier),mix in the oil and vanilla. Then, beat in the eggs one at a time.
3. In another bowl, combine flour, baking powder, baking soda, salt, and ground cinnamon.
4. Add the flour mixture (in three additions) and yogurt (in two additions) to the wet mixture alternately, starting and ending with the flour. Mix only until combined. Gently fold in the chopped strawberries.
5. Pour the batter into the prepared pan and bake about one hour, or until the bread is golden brown and a toothpick inserted in the center comes out clean. Place on a wire rack to cool and then remove the bread from the pan. Serve warm or at room temperature.
Makes 1 loaf.
Note: Definitely bake this for at least 45 minutes, I took mine out a bit too early and the center was a bit gooey (I'm not complaining though). You also want to make sure you wash the strawberries thoroughly before you use them in China because they use quite a bit of pesticide
Sunday, April 19, 2009
Kale (Gai Lan) with Oyster Sauce
My boyfriend bought me a bunch of kale today, thinking it might be spinach, which was what I'd asked. (He was being sweet because I was stuck at home writing assignments and out of veggies)
What can I say? When life gives you kale...make dinner.
I honestly don't know why I've never bought kale in the past. They actually taste pretty good, the stems are really crunchy.
According to WHfood, kale is actually really good for you too, it protects you from ovarian cancer and slows the loss of memory. What more could a girl ask for, really.

My dad was the kale cook at our house and he cooked them using oyster sauce, and that's really the only way I've ever eaten them (bad vegetarian!)This is his recipe:
Kale with Oyster Sauce
1 bunch kale, washed
2 cloves garlic, chopped
1 tablespoon oil
3 tablespoons oyster sauce (or vegetarian oyster sauce)
1 tablespoon soy sauce
1 teaspoon sesame oil
1 teaspoon sugar
2 teaspoons water
1. Heat oil in a pan and fry garlic until it turns brown. Set aside.
2. In a bowl, combine oyster sauce, soy sauce, sesame oil,1/2 teaspoon sugar and water. Set aside.
3. Boil 2 cups water in a pot, add 1/2 teaspoon sugar and some of the garlic with the oil, then boil the kale for about 3 minutes.
4. Arrange kale on a plate, add the garlic with the oil, and pour in the oyster sauce. Serve.
What can I say? When life gives you kale...make dinner.
I honestly don't know why I've never bought kale in the past. They actually taste pretty good, the stems are really crunchy.
According to WHfood, kale is actually really good for you too, it protects you from ovarian cancer and slows the loss of memory. What more could a girl ask for, really.
My dad was the kale cook at our house and he cooked them using oyster sauce, and that's really the only way I've ever eaten them (bad vegetarian!)This is his recipe:
Kale with Oyster Sauce
1 bunch kale, washed
2 cloves garlic, chopped
1 tablespoon oil
3 tablespoons oyster sauce (or vegetarian oyster sauce)
1 tablespoon soy sauce
1 teaspoon sesame oil
1 teaspoon sugar
2 teaspoons water
1. Heat oil in a pan and fry garlic until it turns brown. Set aside.
2. In a bowl, combine oyster sauce, soy sauce, sesame oil,1/2 teaspoon sugar and water. Set aside.
3. Boil 2 cups water in a pot, add 1/2 teaspoon sugar and some of the garlic with the oil, then boil the kale for about 3 minutes.
4. Arrange kale on a plate, add the garlic with the oil, and pour in the oyster sauce. Serve.
Subscribe to:
Posts (Atom)
Previous Posts
About Me
- Talia
- I'm a journalism student and a lacto-ovo vegetarian. Baking, getting random Chinese ingredients, reading recipes and playing in the kitchen are part of my many interests.